Exchange Online. Cross-tenant mailbox migration
이번에는 Cross-tenant Mailbox migration에 대해서 다뤄 보겠습니다.
가장 단순한 Only Cloud 환경으로 진행하였으며, Azure AD Sync 및 Exchange Hybrid 시나리오는 이후에 다루도록 하겠습니다.
Migration 원리에 대해 이해가 필요하시다면, 아래의 글을 먼저 읽어 보시는 것을 권장 드립니다.
2022.04.21 - [Exchange] - Exchange Server. Cross-Forest Migration (1). On-Prem to On-Prem
2022.05.30 - [Exchange] - Exchange hybrid. Cross-forest migration (2) On-Prem to EXO
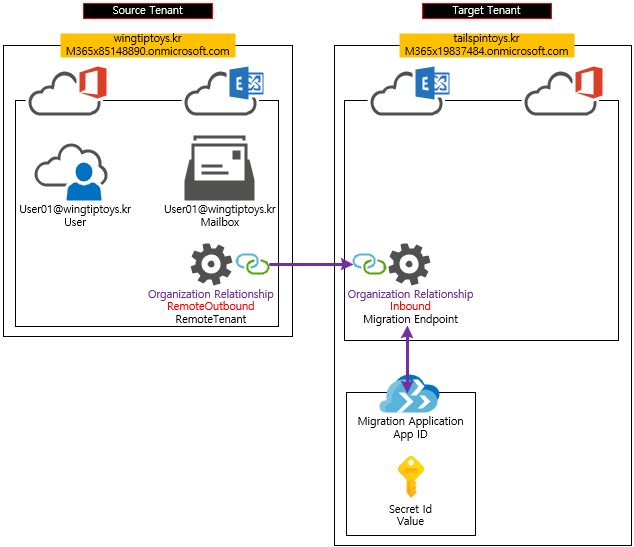
Migration 시나리오 Diagram
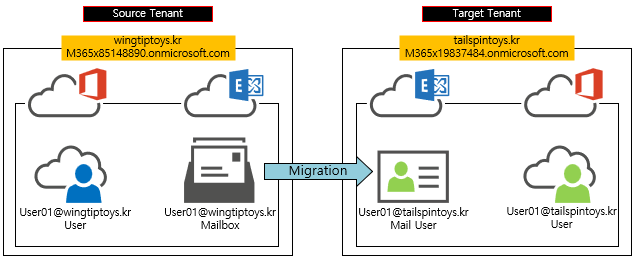
[테스트 환경]
Source Tenant
Tenant: M365x85148890.onmicrosoft.com
Custom domain: wingtiptoys.kr

Target tenant
Tenant: M365x19837484.onmicrosoft.com
Custom domain: tailspintoys.kr

[단계1] Prepare the target (destination) tenant by creating the migration application and secret

https://portal.azure.com 접속(Target Tenant) -> app registrations 검색 -> 클릭

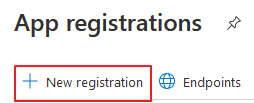
New Registration
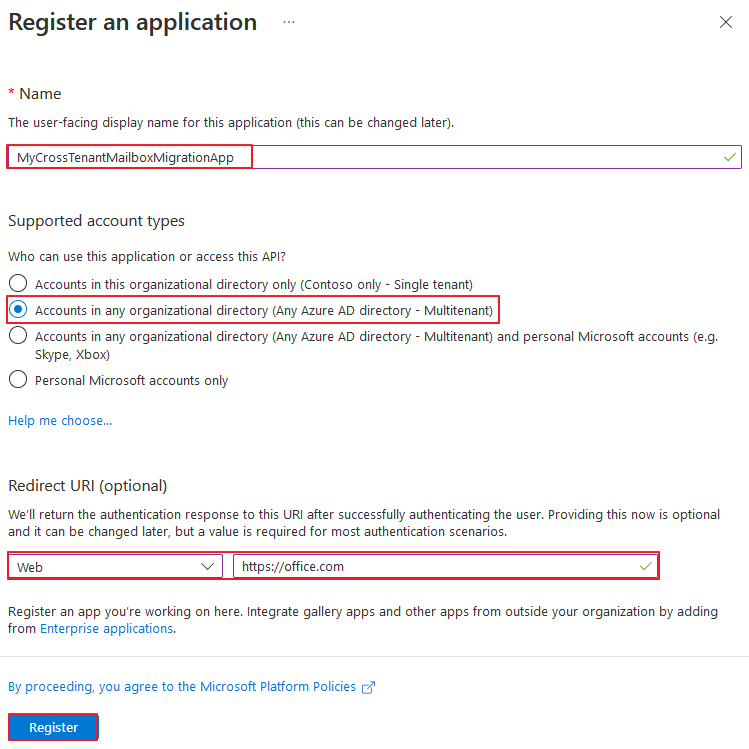
아래와 같이 입력 후 Register
아래와 같이 등록됨 확인 -> 해당 App 클릭
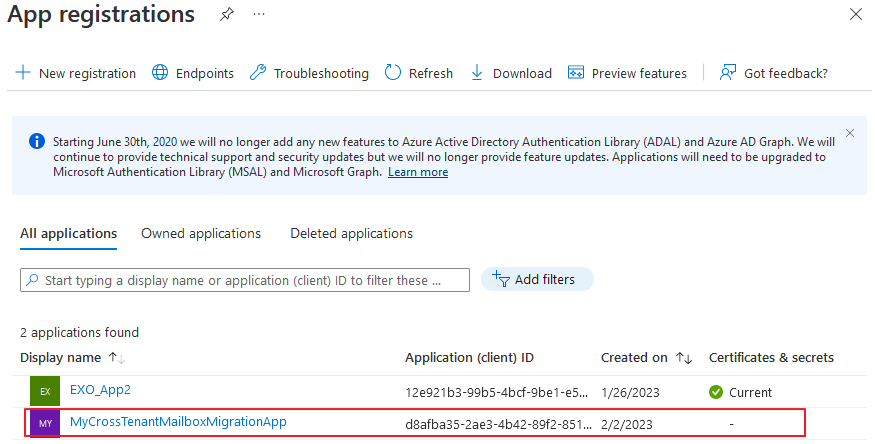
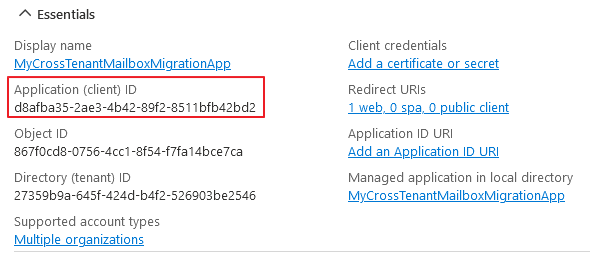
Application ID는 나중에 Target 지정할 때 사용됩니다.
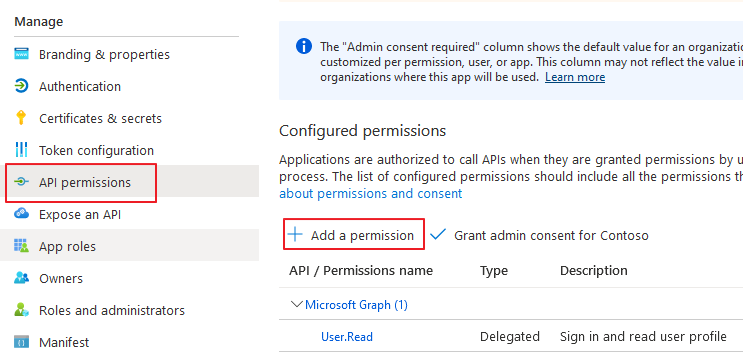
API Permissions -> Add a permission
APIs my organization uses -> Office 365 Exchange Online 검색 -> Office 365 Exchange Online 선택

Application permissions -> Mailbox.Migration 체크 -> Add permission

추가됨 확인

Certificates & secrets -> New client secret

Description 입력 후 Add
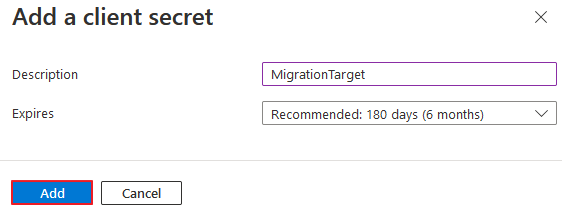
아래의 값을 따로 복사하여 저장합니다. (이후 단계에서 Value 값이 사용됩니다.)

Value: Jtw8Q~YO-xK1t6FZFlaNLZyKMnOifysTCJnFTadc
Secret ID: fa117eb6-661b-4377-a618-3cb1b632a482
Portal Azure -> Azure Active Directory -> Enterprise Application -> 생성한 App 선택

Permissions -> Grant admin for Tenant name 클릭

동의함
권한 생성됨 확인

브라우저 창을 새로 Open한 뒤, 아래의 URL에 접속합니다. (Source Tenant + App ID)
| https://login.microsoftonline.com/contoso.onmicrosoft.com/adminconsent?client_id=[application_id_of_the_app_you_just_created]&redirect_uri=https://office.com |
| https://login.microsoftonline.com/M365x85148890.onmicrosoft.com/adminconsent?client_id=d8afba35-2ae3-4b42-89f2-8511bfb42bd2&redirect_uri=https://office.com |
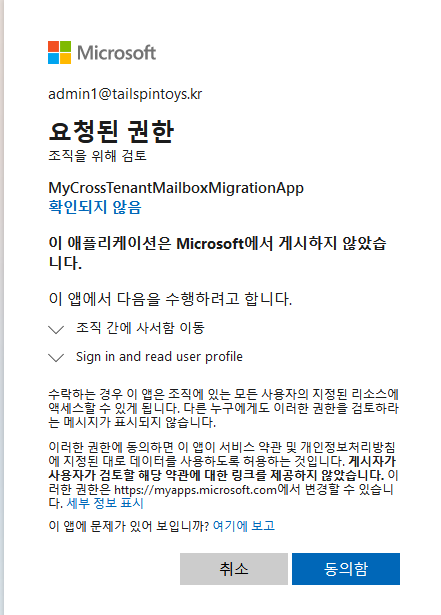
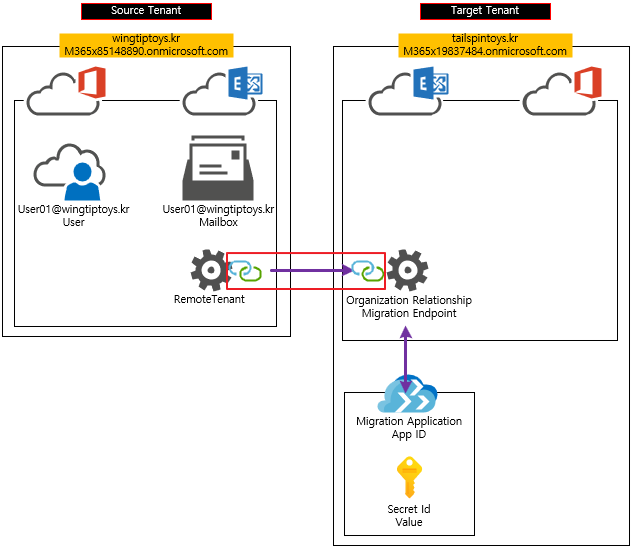
Source Tenant Admin 으로 로그인 한 뒤, 관계수락에 대한 내용에 동의함을 클릭합니다.

아래와 같이 Source Tenant에서 App사용과 관련된 권한을 허용한 개념으로 볼 수 있습니다.
[단계2] Prepare the target tenant by creating the Exchange Online migration endpoint and organization relationship
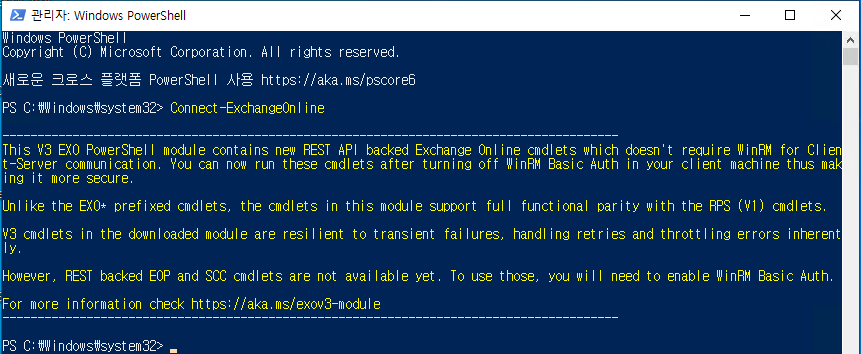
Exchange Online Powershell 접속 (Target Tenant)
조직 설정에서 Cusomization 설정을 활성화 합니다.
#Enable customization if tenant is dehydrated
Get-OrganizationConfig | select isdehydrated
Enable-OrganizationCustomization
App ID 변수 지정
#App ID 입력
$AppId = "[guid copied from the migrations app]"
$AppId = "d8afba35-2ae3-4b42-89f2-8511bfb42bd2"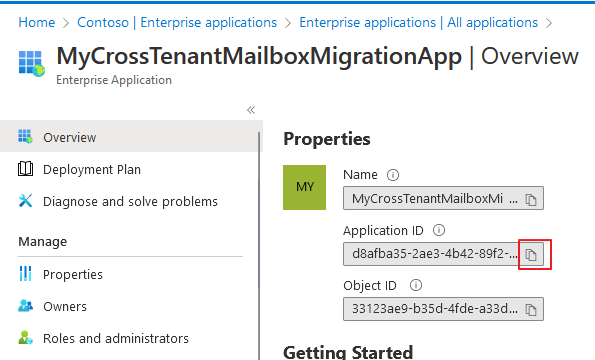
Migration Endpoint 생성 과정 진행
#Migration Endpoint 생성
#Sample
$Credential = New-Object -TypeName System.Management.Automation.PSCredential -ArgumentList $AppId, (ConvertTo-SecureString -String "[this is your secret password you saved in the previous steps]" -AsPlainText -Force)
New-MigrationEndpoint -RemoteServer outlook.office.com -RemoteTenant "contoso.onmicrosoft.com" -Credentials $Credential -ExchangeRemoteMove:$true -Name "[the name of your migration endpoint]" -ApplicationId $AppId

#테스트환경 예제
$Credential = New-Object -TypeName System.Management.Automation.PSCredential -ArgumentList $AppId, (ConvertTo-SecureString -String "Jtw8Q~YO-xK1t6FZFlaNLZyKMnOifysTCJnFTadc" -AsPlainText -Force)
New-MigrationEndpoint -RemoteServer outlook.office.com -RemoteTenant "M365x85148890.onmicrosoft.com" -Credentials $Credential -ExchangeRemoteMove:$true -Name "wingtiptoys.kr" -ApplicationId $AppId
명령어 구조를 보면, 생성한 Migration Application은 아래와 같이 연결하는 개념으로 볼 수 있습니다.

Remotetenant Sourcetenant로 지정됨으로써 끝점이 연결되는 구조입니다.

Organization Relationship 생성과정 진행
#Organization Relationship 생성
$sourceTenantId="[tenant id of your trusted partner, where the source mailboxes are]"
$orgrels=Get-OrganizationRelationship
$existingOrgRel = $orgrels | ?{$_.DomainNames -like $sourceTenantId}
If ($null -ne $existingOrgRel)
{
    Set-OrganizationRelationship $existingOrgRel.Name -Enabled:$true -MailboxMoveEnabled:$true -MailboxMoveCapability Inbound
}
If ($null -eq $existingOrgRel)
{
    New-OrganizationRelationship "[name of the new organization relationship]" -Enabled:$true -MailboxMoveEnabled:$true -MailboxMoveCapability Inbound -DomainNames $sourceTenantId
}
---------------------------------------------------------------
#테스트환경 예시
$sourceTenantId="36649294-1657-4227-90b8-2ed4ac8c2924"
$orgrels=Get-OrganizationRelationship
$existingOrgRel = $orgrels | ?{$_.DomainNames -like $sourceTenantId}
If ($null -ne $existingOrgRel)
{
    Set-OrganizationRelationship $existingOrgRel.Name -Enabled:$true -MailboxMoveEnabled:$true -MailboxMoveCapability Inbound
}
If ($null -eq $existingOrgRel)
{
    New-OrganizationRelationship "wingtiptoys.kr" -Enabled:$true -MailboxMoveEnabled:$true -MailboxMoveCapability Inbound -DomainNames $sourceTenantId
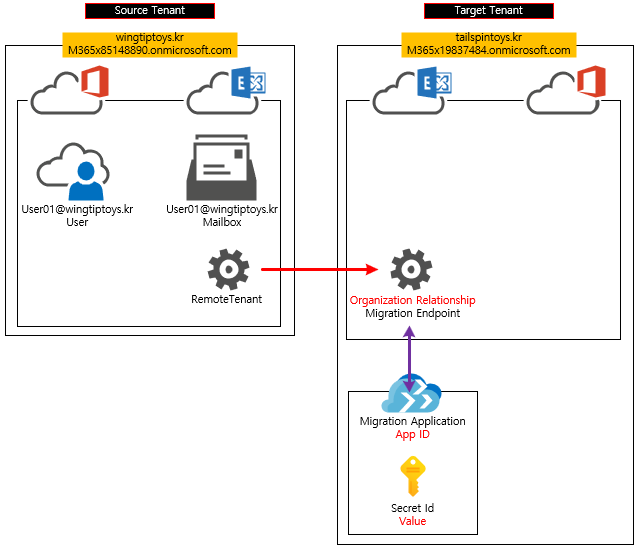
}MailboxMoveCapability는 Cross-Tenant Mailbox Migration의 방향을 지정하는 것으로 이해하였습니다.

$sourceTenantId="36649294-1657-4227-90b8-2ed4ac8c2924" -> Source Tenant 에서 tenant ID 값을 복사


아래와 같이 Migration 방향을 Enable 설정한 것으로 보입니다.
[단계3] Prepare the source (current mailbox location) tenant by accepting the migration application and configuring the organization relationship
Source Tenant에서 메일 사용이 가능한 보안 그룹 생성과정을 진행합니다.

이름 입력
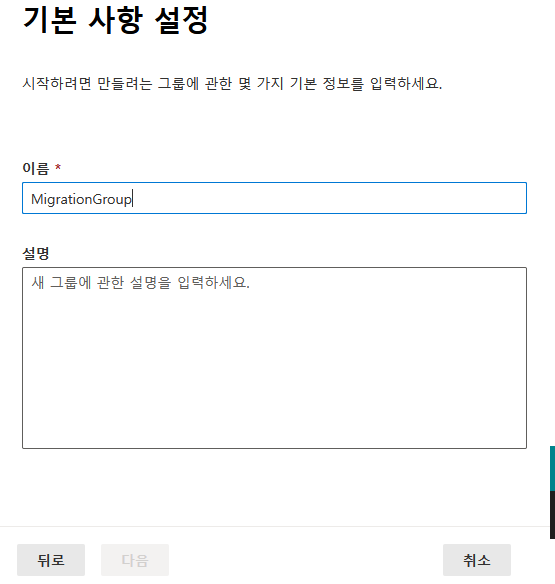
해당 그룹에 마이그레이션 대상 사서함을 추가합니다.

주소 지정 -> 생성 완료

Source Tenant에서 Exchange Online Powershell 연결

Source Tenant의 Organization Relationship 생성
#Source Tenant의 Organization Relationship 생성
$targetTenantId="[tenant id of your trusted partner, where the mailboxes are being moved to]"
$appId="[application id of the mailbox migration app you consented to]"
$scope="[name of the mail enabled security group that contains the list of users who are allowed to migrate]"
   $orgrels=Get-OrganizationRelationship
$existingOrgRel = $orgrels | ?{$_.DomainNames -like $targetTenantId}
If ($null -ne $existingOrgRel)
{
    Set-OrganizationRelationship $existingOrgRel.Name -Enabled:$true -MailboxMoveEnabled:$true -MailboxMoveCapability RemoteOutbound -OAuthApplicationId $appId -MailboxMovePublishedScopes $scope
}
If ($null -eq $existingOrgRel)
{
    New-OrganizationRelationship "[name of your organization relationship]" -Enabled:$true -MailboxMoveEnabled:$true -MailboxMoveCapability RemoteOutbound -DomainNames $targetTenantId -OAuthApplicationId $appId -MailboxMovePublishedScopes $scope
}
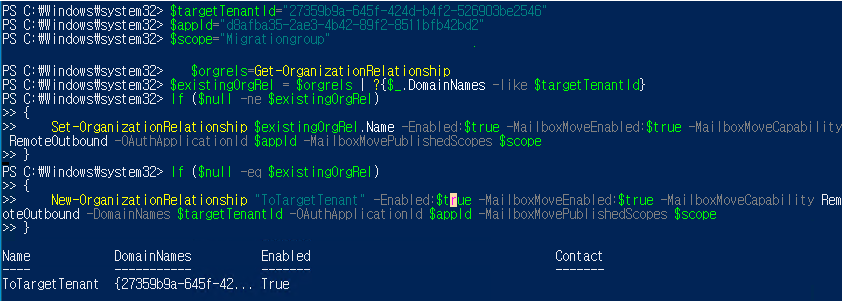
#테스트환경 예시
$targetTenantId="27359b9a-645f-424d-b4f2-526903be2546"
$appId="d8afba35-2ae3-4b42-89f2-8511bfb42bd2"
$scope="Migrationgroup"
   $orgrels=Get-OrganizationRelationship
$existingOrgRel = $orgrels | ?{$_.DomainNames -like $targetTenantId}
If ($null -ne $existingOrgRel)
{
    Set-OrganizationRelationship $existingOrgRel.Name -Enabled:$true -MailboxMoveEnabled:$true -MailboxMoveCapability RemoteOutbound -OAuthApplicationId $appId -MailboxMovePublishedScopes $scope
}
If ($null -eq $existingOrgRel)
{
    New-OrganizationRelationship "ToTargetTenant" -Enabled:$true -MailboxMoveEnabled:$true -MailboxMoveCapability RemoteOutbound -DomainNames $targetTenantId -OAuthApplicationId $appId -MailboxMovePublishedScopes $scope
}
각각의 테넌트의 Organization Relationship 설정을 통해서 RemoteOutbound, Inbound 관계 설정이 완료되었습니다.
[단계4] MailUser 생성
Source Tenant에서 Migration 사서함의 속성 확인
Get-Mailbox -Identity user01 |Select-Object PrimarySMTPAddress,Alias,SamAccountName,FirstName,LastName,DisplayName,Name,ExchangeGuid,ArchiveGuid,LegacyExchangeDn,EmailAddresses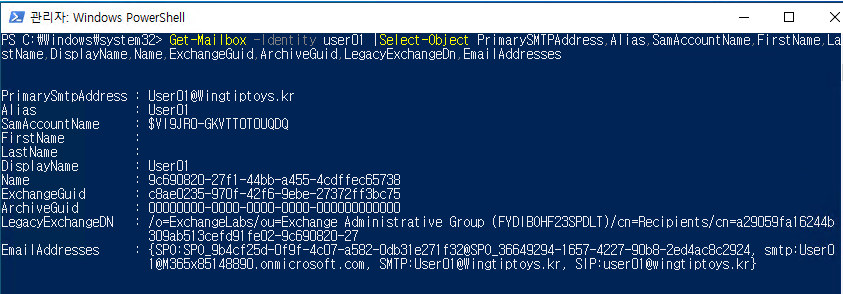
Target Tenant에서 Mail User를 생성합니다.
#Mail User 생성
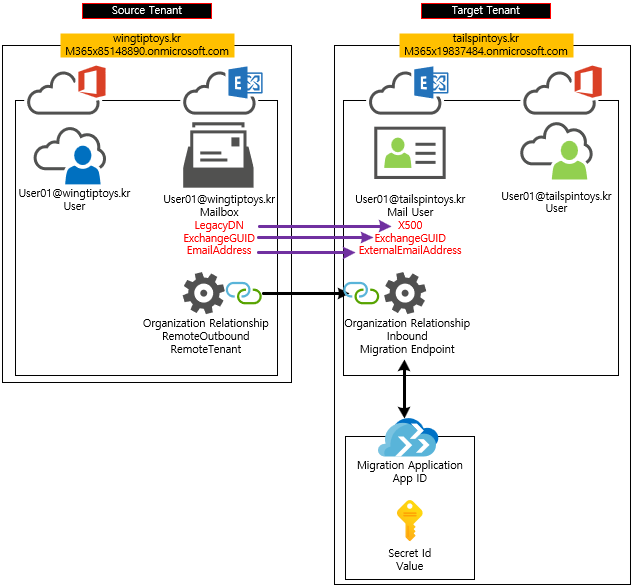
New-MailUser -MicrosoftOnlineServicesID User01@tailspintoys.kr -PrimarySmtpAddress User01@tailspintoys.kr -ExternalEmailAddress user01@wingtiptoys.kr -Name User01 -DisplayName User01 -Alias User01

#x500, Exchange GUID 추가
Set-MailUser -Identity User01 -EmailAddresses @{add="X500:/o=ExchangeLabs/ou=Exchange Administrative Group (FYDIBOHF23SPDLT)/cn=Recipients/cn=a29059fa16244b309ab513cefd91fe02-9c690820-27"} -ExchangeGuid "c8ae0235-970f-42f6-9ebe-27372ff3bc75"

#onmicrosoft.com 주소 추가
Set-MailUser -Identity User01 -EmailAddresses @{add="smtp:user01@M365x19837484.onmicrosoft.com"}

아래와 같이 각각의 속성이 Mapping하도록 생성하였습니다.
아래의 명령어로 Migration 연결 상태를 확인합니다.
Test-MigrationServerAvailability -Endpoint "wingtiptoys.kr" -TestMailbox "user01@M365x19837484.onmicrosoft.com"
[단계5] Migration 진행
Migration -> Add Migration batch

Migration to Exchange Online -> Next
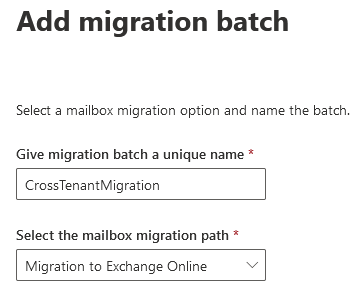
Cross tenant migration -> Next

Next

생선된 migration endpoint 선택 ->Next

Import CSV file

Target Email Address를 입력한 CSV를 생성하여 Import 를 진행합니다.

Target delivery domain을 Target Tenant의 onmicrosoft.com 주소를 입력합니다. -> Next

Save

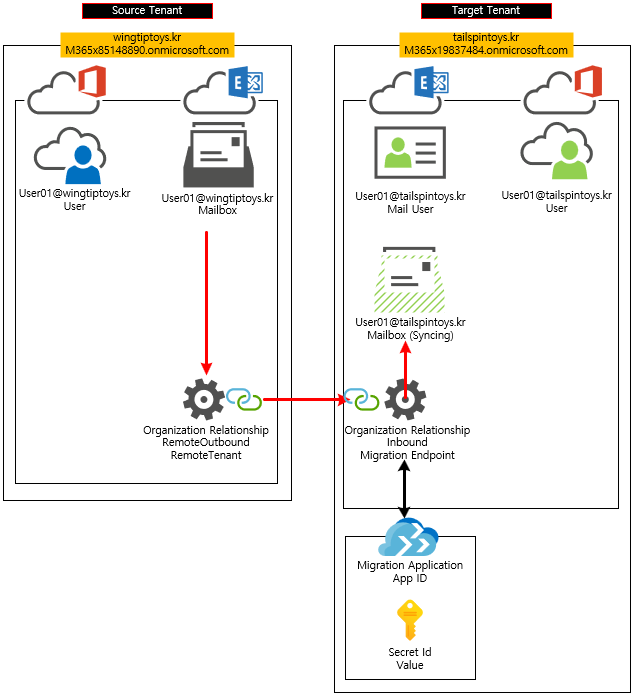
아래와 같이 동기화가 진행됩니다.

아래의 흐름은 네트워크 적인 연결이 아닌, 각각의 설정의 연결을 의미합니다. Migration 연결방식은 기존 Hybrid 처럼 MRS Proxy로 연결되는 것은 동일할 것입니다.
라이선스 할당 상태를 확인한 뒤, Complete migration batch 를 클릭합니다.

아래와 같이 Migration 된 사서함을 확인할 수 있습니다.

그리고 기존 Source Mailbox는 Mail User로 변경됩니다. External Address가 Target Tenant 주소 이기 때문에 전환된 이후 수신된 메일은 Target Tenant로 전달하게 됩니다.
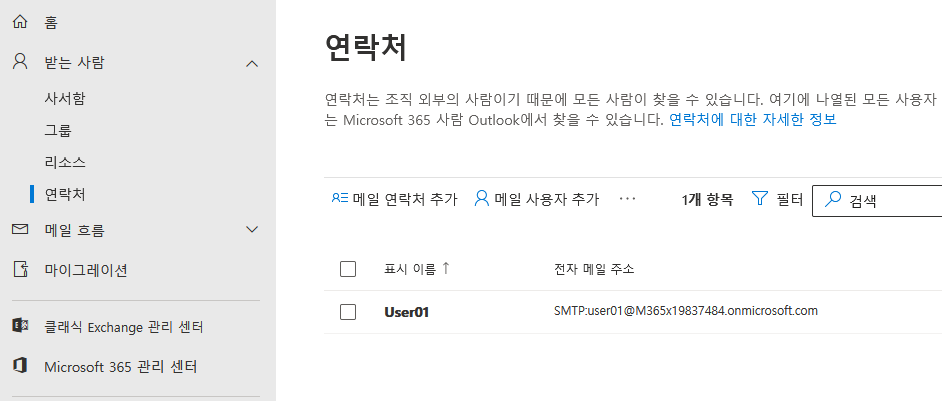
전반적인 Migration 흐름은 Exchange hybrid, Cross-Forest와 크게 다르지 않습니다.
